My Mother in Law doesn’t get rid of anything. She’s got bins and boxes and a BUILDING full of nic-nacs, odd & ends, family heirlooms and other random stuff (aka junk). Occasionally I benefit from her collecting (aka hoarding according to the Hubs). Recently we were looking for something that the Hubs wanted and I stumbled across an entire dresser stuffed with vintage doilies… My brain started spinning with all the crafty possibilities! I snagged a couple of my favorite ones to put to good use! First up, this absolutely fabulous DIY doily clock!
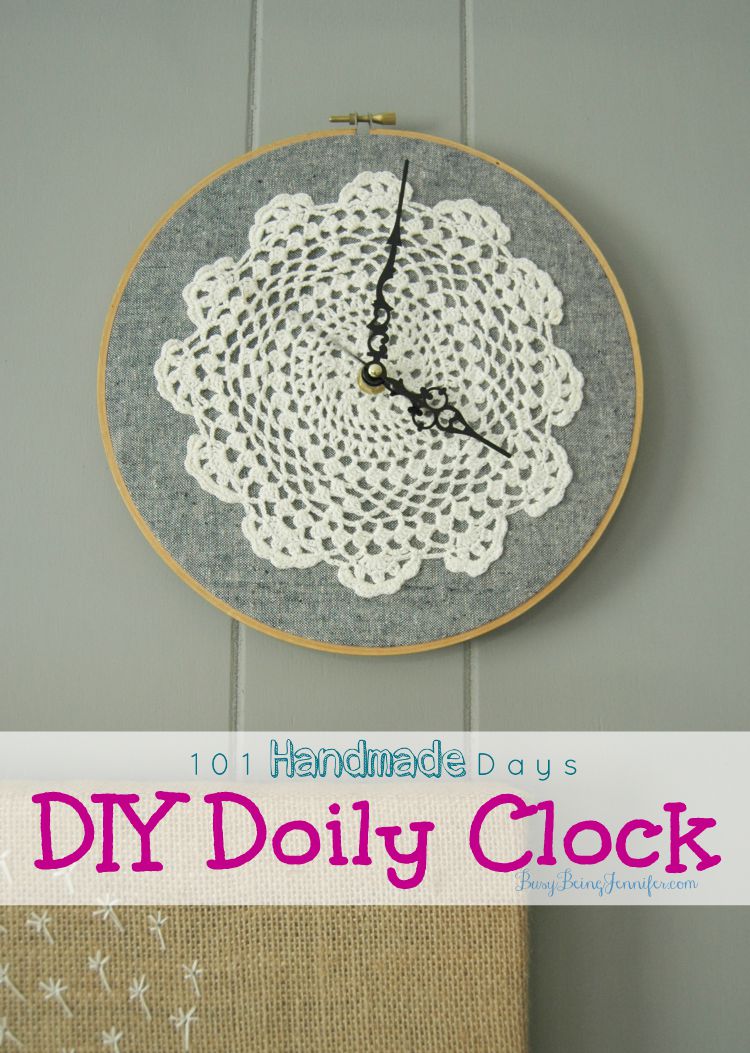
Don’t worry! My MIL gave me permission to take the doilies 😉 The one that I use in this DIY doily clock was purchased at a thrift store and had no sentimental value. I will get my hands on the “special” ones some day… and I’m going to come up with a worthy project for those. In the mean time, Lets talk about how you can make your own DIY Doily Clock!
Here’s what you need:
9″ Wooden Embroidery Hoop
12″ x 12″ piece of fabric
6″ Doily
Sewing Machine & Thread
Scissors
Glue Gun & Glue
Clock Works
Cardboard (at least a 10″ square)

Step 1: Sew the doily to the fabric. Follow the edge and sew all the way around, making sure that the doily is even and flat. Then go around a few times on the inner sections, be sure to sew close to the center where the clock works will be.
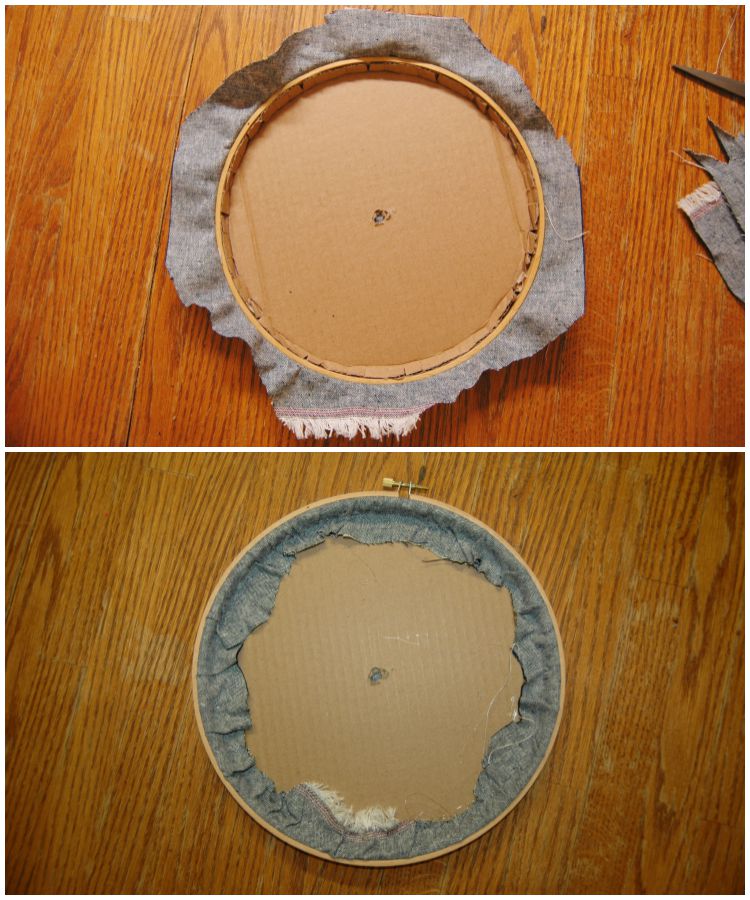
Step 2: Take the inner ring of the embroider hoop and place it on the cardboard. Trace a circle on both sides of the hoop. I angled my pen slightly to make sure that the cardboard would fit inside AND have enough of an edge to glue. Cut out your cardboard circle, around the outer circle. Then carefully cut slits from the edge of the cardboard to the inner circle. Fold the flaps back to the line.
Step 3: Slide the cardboard circle into the inner embroidery hoop. Pull back a few of the flaps and glue in place. Then find the center of of of the circle. Poke a hole and widen it to fit your clock pieces.
Step 4: Place the fabric and doily on top of the center/cardboard piece and center. Gently slide the outer embroidery hoop over it. Tighten it, and carefully tug on the fabric to tighten and center the doily as needed.
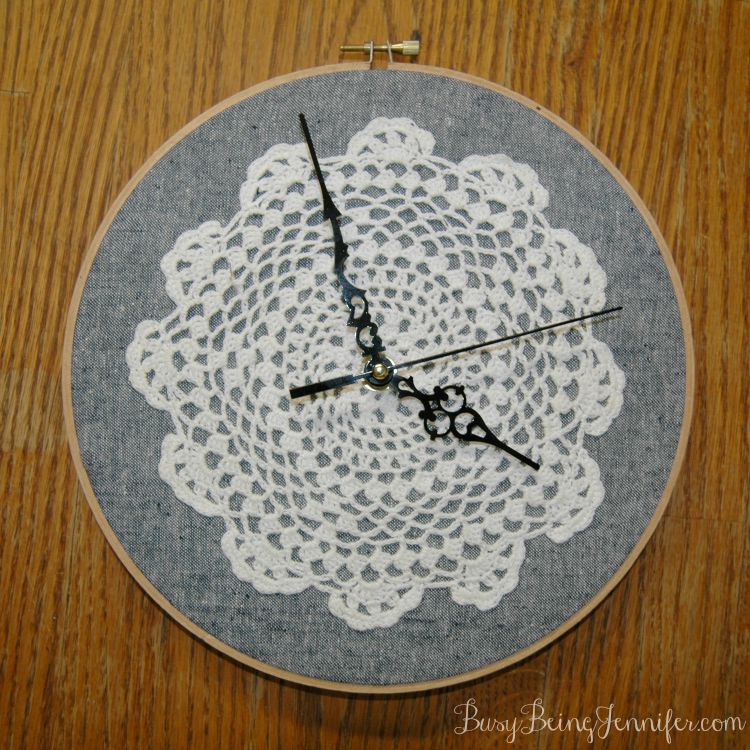
Step 5: Using the scissors, poke a hole through the centered cardboard hole and into the fabric. Widen enough to just fit the clock works. Trim the corners of the fabric off.
Step 6: Run a 3″ line of hot glue along the edge of the of the folded cardboard, push the fabric into the glue and tuck as necessary. Repeat all the way around to secure the access fabric to the back.
Step 7: Add your clock works! I just ordered one off of amazon, but it didn’t come with instructions :s Fortunately my Father-in-Law is a clock making/fixing genius and he helped me put the pieces together in less than 5 minutes! I’m sure I could have figured it out on my own… but hey! He’s right next door, so why not get his help?!?! 😀
Now, find the perfect spot and hang your favorite new creation! A pretty DIY doily clock will add a little vintage charm to any room in your home.

I couldn’t be happier with the way my DIY Doily Clock turned out! It was exactly what this little wall space needed and I can’t help but stare at it a little 🙂 Its just so danged pretty!!
Wow, Jennifer, this is so lovely! I just adore how dainty & shabby chic it is & it can really fit into an antique room, but really anywhere. Sharing!
I literally just purchased clock parts from a craft store and have been on the look out for a tutorial.
Yay!!! I might be just a little addicted to making these… seriously thinking about making a whole wall with difference doilies/clocks!
Super cute, you did a great job!
This is adorable! Super creative!!
How creative! Love the doily and love the idea of a personalized clock, good item to add to the holiday list.
I have so many doilies from my grandmother and I have no idea what to do with them. Cute idea!
What a cute idea! I love the old fashioned feel to it. My mother in law would love this!! My mind is swimming with Christmas gift ideas. :o)
Oh my goodness! This is amazing. I love the clock.
Wow, I never knew it was so easy to make a clock. Another great idea Jennifer! Stacie xo
I have loved DIY clocks ever since they were a college project (graphic design major… lots of art projects) but I have never seen a doily clock! I absolutely love how it blends in with the rest of your decor! Super cute!
Awesome post! I would love to invite you to my new link party The Beautifully Creative Inspired. The party launched today and will continue every Fridays at 9AM eastern time on 5 BLOGS! It runs until Wednesday night 😀 Hope you can party with us!
This is GREAT! I love pairing up doilies with embroidery hoops. 🙂 Thank you for swinging by Snickerdoodle Sunday and hope to see your latest makes later today!
Sarah (Sadie Seasongoods)
This turned out so cute! I wanted to let you know that I’m featuring this post tonight at the Create & Share Link Party (7:00 PM MST)! Congratulations!!! Can’t wait to see what you share with us this week. 🙂
Super Cute! Such a great idea!
I love doilies! And projects with doilies!! PINNED. Your friend, Linda @Crafts a la mode
Love your clock Jennifer! Congrats – you are our Friend Of The Week and In The Spotlight at Friendship Friday at Create With Joy! 🙂
Love it, and how wonderful that the mother in law is a hoarder and so all the stuff is by her! I unfortunately will likely be that kind of mother in law too…….just hope it is all organized and accessible! thanks for sharing on crafton craft schooling Sunday!
Hi Jennifer, What a great idea to use the doily as a clock! So cute with the grey background! Love it!
What an amazing idea! Love the vintage/rustic feel of it! It goes so well with your Breath art too.
Wonderful creation Jennifer,love it!!
Thanks so much for sharing your creation with Turn It Up Tuesday, voted this as my favorite for this week’s party. Have a great day:)
Isn’t this sweet! I think this would be so much fun for a little girl’s nursery! Thanks for sharing this with us on Throwback Thursday! Hope to see you next week!
Mollie
Thank you so much for linking this post up on #HomeMattersParty last week. It was picked as one of our feature posts. You can check it out at http://adventuresfrugalmom.com/home-matters-linky-party-77/. While you are there make sure to grab the I was Featured button for your sidebar so you can brag a little. Thanks for linking up and hope to see you link up again.
I love the idea of using an embroidery hoop for this. Going to pin this for my long weekends!