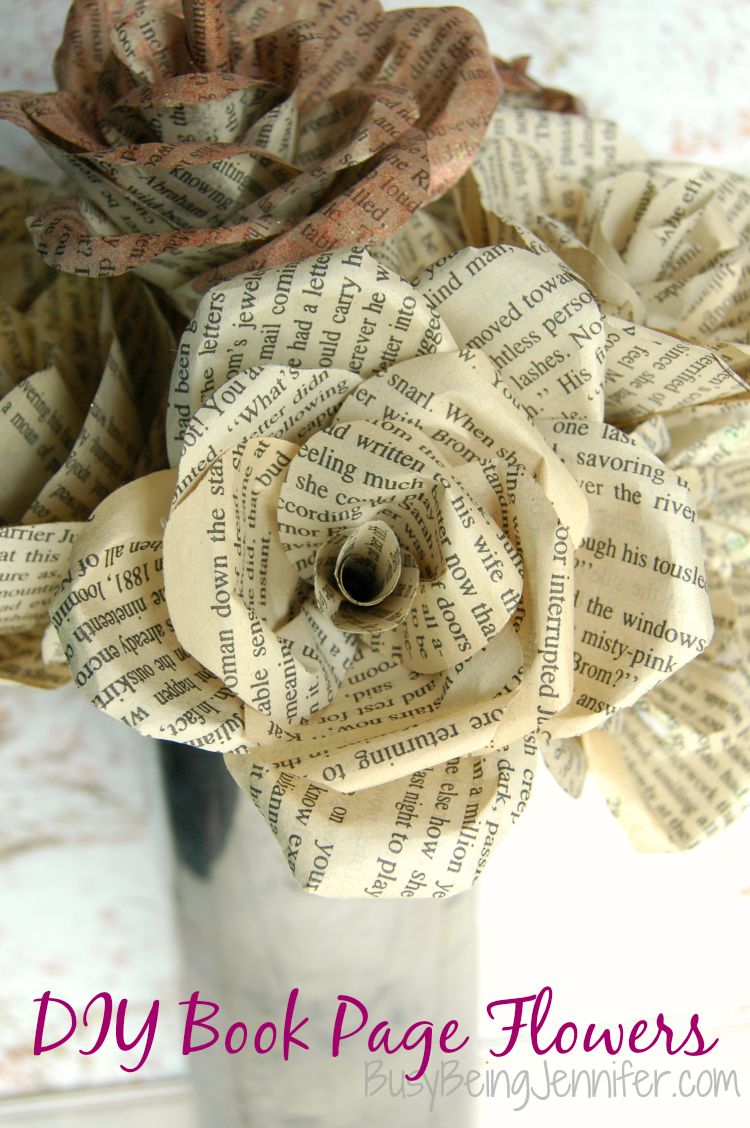
I’m addicted to making these pretty DIY book page flowers! With a little paint, they are perfect for any season! And you can use them in so many projects.
In this house, nothing goes to waste! Not even old, falling apart books!
With fall practically upon us and all things fall-colors coming out of the wood work, I’m getting all kinds of fall-crafty up in here! Starting with this pretty book page upcycle project!
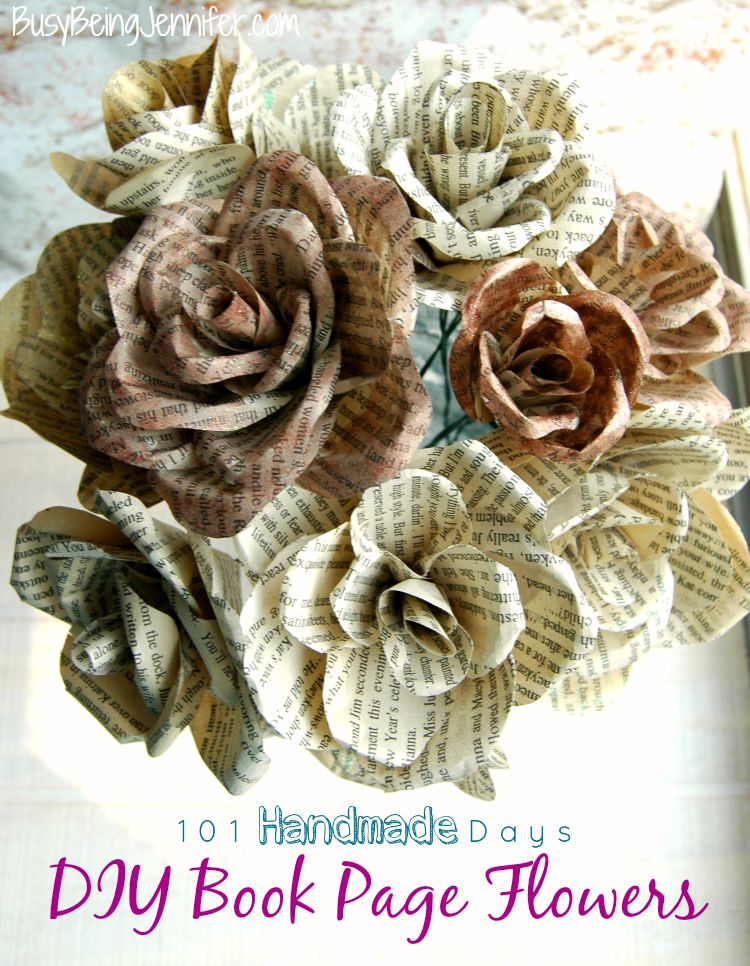
Seriously y’all! Making these DIY book page flowers can kind of be addicting! And they’re easier than you think, maybe a little time consuming… but easy!!!
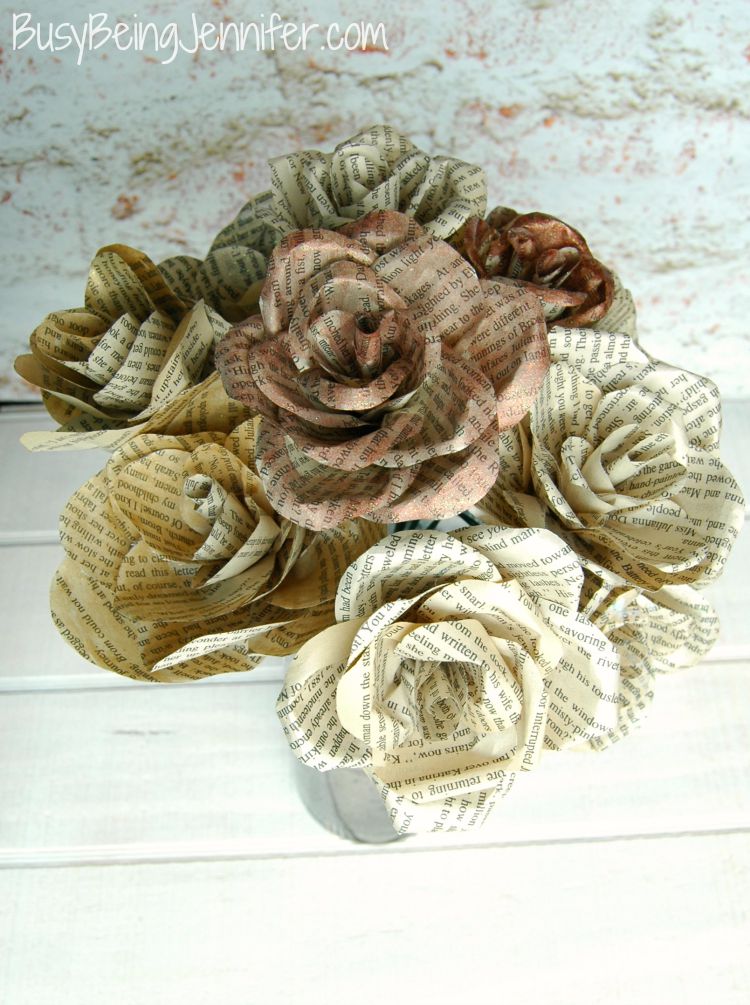
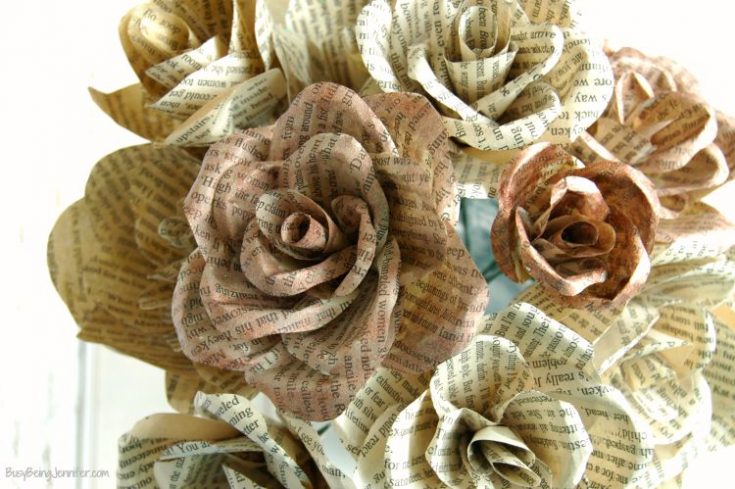
And they make perfect home decorations. You can put them in a vase, make a wreath with a hot glue gun, you could even put them on the Christmas tree, if you’re looking for some fun and unique ornaments.
This is absolutely one of the best DIY projects to repurpose old books that I’ve ever tackled.
What You Need to Make Paper Roses:
Here’s what you need to make your own diy book page flowers:
An Old Book – pull out the pages (you don’t have to use your favorite books, or vintage book pages, any old book will do)
Hot Glue & Glue Gun
Scissors
Floral Wire
Pen / Pencil
Ribbon or Lace
Optional – paint, brushes, water etc. if you’d like to take this upcycled book craft project to another level and paint the lovely book pages different shades. Oooh!

How to Make Book Page Flowers
Step One: Cut out your flower petals. I started by making a template for the largest flower petal, traced it and then cut it smaller. Repeat for 6 petals. the smallest should be about an inch in height and the largest should be about 3 inches. Cut out a WHOLE bunch of each size.
Step Two: Take one of the floral wired, bend in half and give it a couple twists to make the stem. Take one of the smallest petals, add a dot of hot glue on an corner, and place the folded end of the floral wire stem on the hot glue. Roll the first petal tightly around the stem and secure with hot glue.
Step Three: Pinch in the edge on each side of your next petal and secure with hot glue. Carefully roll the top edge of the Add a line of glue to the bottom of the petal and wrap it around the stem/first petal.
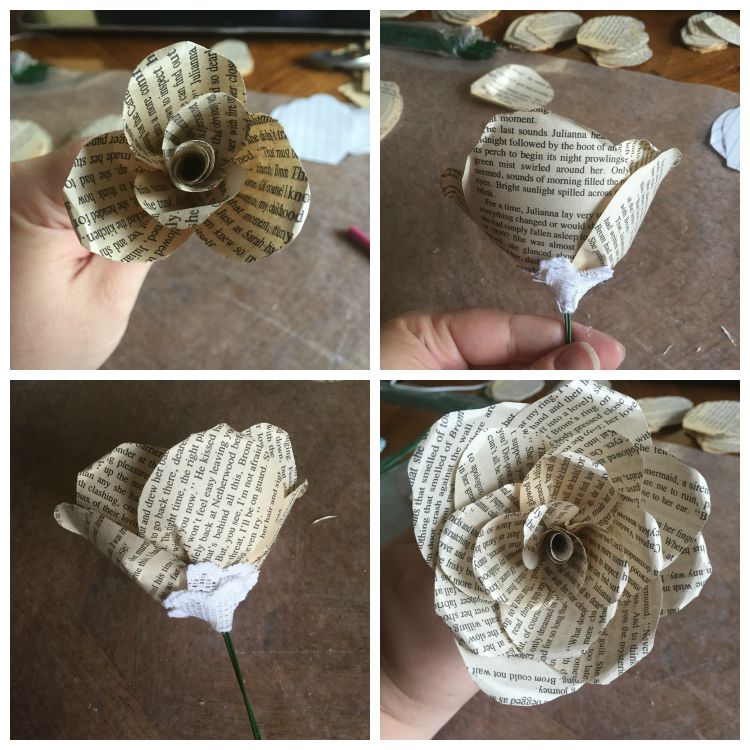
Step Four: Repeat step three, increasing the petal size until you’re happy with how big the flower is.
Step Five: Finish off your flower with lace or ribbon at the bottom. I had a lace with a scalloped edge, so I cut “2 bump” sections and wrapped them around the base, with the scalloped side up.
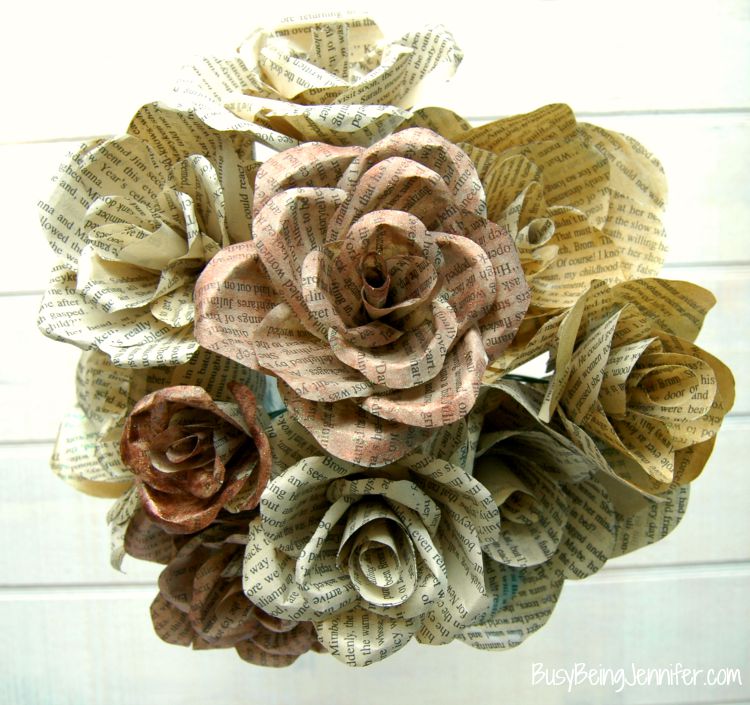
Step Six: Paint your flowers… if you want. I mixed some gold and copper paints with an iridescent glitter paint and 1 part water. I painted a couple of the flowers in each color and left some plain. I’m quite happy with the mix! They feel very fall-ish 🙂

Frequently Asked Questions:
DIY Flower Craft FAQ
Q: How many petals do I need to cut for each flower?
A: You will need to cut out 6 petals in total, ranging from the smallest at approximately 1 inch in height to the largest at around 3 inches. You’ll need roughly 4-5 petals in each size for each individual flower.
Q: How do I create the stem for the flower?
A: Take one floral wire and bend it in half. Give it a couple of twists to secure the folded end and create the stem for your flower.
Q: How do I attach the first petal to the stem?
A: Add a dot of hot glue on one corner of the smallest petal. Place the folded end of the floral wire stem on the hot glue. Then, tightly roll the first petal around the stem and secure it with hot glue. Hot glue is your best friend for this project.
Q: How do I attach the subsequent petals?
A: Wrap the petal around the stem/first petal, repeating this step for each additional petal.
Q: How can I determine the size of the flower?
A: Add petals until you achieve your desired size and shape.
Q: How can I finish off my flower?
A: Finish off your flower by adding lace or ribbon at the bottom. Cut sections of lace, especially the scalloped edge, into “2 bump” sections and wrap them around the base of the flower with the scalloped side facing up.
Q: Can I paint the flowers?
A: Yes, if you want to add some color and customization to your flowers, you can paint them. Mix gold and copper paints with an iridescent glitter paint and add 1 part water to create a paint mixture. Paint a couple of the flowers in each color or leave some plain for variation and a fall-inspired feel.
I told you these were perfectly fall-ish! I’m definitely addicted to making these pretty diy book page flowers… I’m thinking these would be a great edition to a fall wreath too!
I feel another round of craftiness coming on!!
Can you imagine a pretty wreath with these flowers just all over ALL OVER and nothing but book roses? Oh, that would be beautiful.
Or even a set of matching swag that I could hang in my windows that face the street? With an LED light tucked inside. Now we’re talking crafty!
DIY Book Page Flowers
With fall practically upon us and all things fall-colors coming out of the wood work, I’m getting all kinds of fall-crafty up in here! Starting with these pretty DIY Book Page Flowers!
Materials
- An Old Book – pull out the pages
- Floral Wire
- Ribbon or Lace
Tools
- Hot Glue & Glue Gun
- Scissors
- Pen/Pencil
Instructions
- Cut out your flower petals. I started by making a template for the largest flower petal, traced it and then cut it smaller. Repeat for 6 petals. the smallest should be about an inch in height and the largest should be about 3 inches. Cut out a WHOLE bunch of each size.
- Take one of the floral wired, bend in half and give it a couple twists to make the stem. Take one of the smallest petals, add a dot of hot glue on an corner, and place the folded end of the floral wire stem on the hot glue. Roll the first petal tightly around the stem and secure with hot glue.Step Three: Pinch in the edge on each side of your next petal and secure with hot glue. Carefully roll the top edge of the Add a line of glue to the bottom of the petal and wrap it around the stem/first petal.
- Repeat step three, increasing the petal size until you’re happy with how big the flower is.
- Finish off your flower with lace or ribbon at the bottom. I had a lace with a scalloped edge, so I cut “2 bump” sections and wrapped them around the base, with the scalloped side up.
- Paint your flowers… if you want. I mixed some gold and copper paints with an iridescent glitter paint and 1 part water. I painted a couple of the flowers in each color and left some plain. I’m quite happy with the mix! They feel very fall-ish 🙂
So cute!!
They would be perfect for a fall wreath!
Oooh I could mix in some painted black or orange ones for a spooky addition to my Halloween decor.
I’m always looking for something to do with the girl guides as well, this kind of craft is right up our alley 🙂
These are so lovely, and I know I have some old books laying around. I made paper flowers with scrapbook paper once, but I was not super thrilled with how they turned out, it was hard working with the sturdy paper. These look much better than what I did and I think the book pages would be much easier to work with!
Beautiful flowers! I do love the combination of some being painted and some not. Plus book crafts are always fun!
These are totally gorgeous. Need to try making some!
So pretty! I especially love the ones that are tinted pink. These would be perfect for a Beauty and the Beast themed party. Books & roses! My mom would love this craft! Pinned!
Those are just beautiful! Really, really lovely!
I fell in love with your flowers the minute I saw them. Thanks so much for sharing at Bound by Books.
I love these!! What a great idea easy too:)
These are so pretty! I love playing with paper too! Found you on Turn it Up Tuesday.
Linda
mysewwhatblog
Gorgeous! I really love how these turned out. Thank you for linking up at Snickerdoodle Sunday and hope to see you again this weekend. 🙂
Sarah (Sadie Seasongoods)
They look amazing and so vintage! Thanks for joining the Thursday Favorite Things Blog Hop!
Jennifer these are very pretty, I’ll have to bribe my daughter into making some for me. Have a great weekend.
Oh my This looks so incredible! Pinned and tweeted. We love partying with you and we appreciate you stopping by! Please take a minute to stop by next week, so we can pin and tweet your new creation. The party starts on Monday at 7 pm! Have a great Sunday! Lou Lou Girls
Thanks so much for linking these up last week at our Bewitchin’ Projects Block Party! I absolutely love them and chose you to be one of my 3 featured posts this week at http://www.recreateddesigns.com. Congrats and thanks again! I will definitely have to try these 🙂 Hugs, Lisa
Hi there
Just stopped by to let you know that I featured this on my Round Tuit post this week!
A Round Tuit 277
Thanks again for linking up! Hope you have a great week!
Jill @ Creating my way to Success
What a great idea. They look so pretty too! thanks for sharing at the #HomeMattersParty
Absolutely gorgeous…you did a beautiful job! Thanks so much for sharing at Share The Wealth Sunday!
xoxo
Lisa
These are absolutely beautiful and I need to try this for myself as soon as possible! They would look great with my book page wreath!
Please stop by and share this awesome project with the rest of us at our Wake Up Wednesday link party! I know everyone will love them!
http://www.theorganizeddream.com/2015/09/wake-up-wednesday-88.html
Kate | The Organized Dream
Wow! I love these! As huge booklovers, I see me and my daughter making these soon! Visiting as a guest host from Turn It Up Tuesday!
These are stunning Jennifer – thanks for sharing them at Create With Joy! 🙂
Hey, stopping by from Diana Rambles! LOVE this project and would like to invite you to link up at my new party! Every Thursday at 7pm EST. Hope to see you there!
Jennifer, I couldn’t get your lovely flowers out of my mind! Congrats – you’re one of our guests at this week’s Inspire Me Monday Party (196) at Create With Joy! 🙂
Thank you so much!!
Pretty! What a nice (and inexpensive) way to create some vintage-looking flowers. I really like the depth the paint gives to them.
Thanks for sharing with us at the #HomeMattersParty link party
I wish I had an ounce of your craftiness! These are so vintage chic, I love them!! Thanks for adding your link to the Best of the Blogosphere!
The paper roses are very pretty.
I love these, they are beautiful, thanks for sharing them at the Thursday Favorite Things Blog Hop.
I would love to try and make these. They are beautiful! Thanks for sharing with us at Family Joy Blog Link Up Party this week! Have a lovely week!
I love these so much! I have pinned and tweeted 🙂 (stopping by from the terrific Tuesday link-up)
Beautiful! Thanks for sharing should a great and easy to follow tutorial. Pinning.
Those are absolutely beautiful!! http://www.quirkybohemianmama.com/
Pretty paper flowers & nice DIY. Thanks for sharing at the Inspiration Spotlight party.Shared.
These are so pretty! I had book page flowers at my wedding 🙂 Brings back good memories.
What a creative idea! These paper flowers turned out beautifully! Thanks for sharing with us at Share The Wealth Sunday. I hope we see you again tonight!
These are so pretty! I’d like to try them with some sheet music pages!
These are lovely. As another commenter said they would be pretty in a wreath.
These are very pretty and very creative!
Just what I was looking for Thank you for sharing
A very great idea