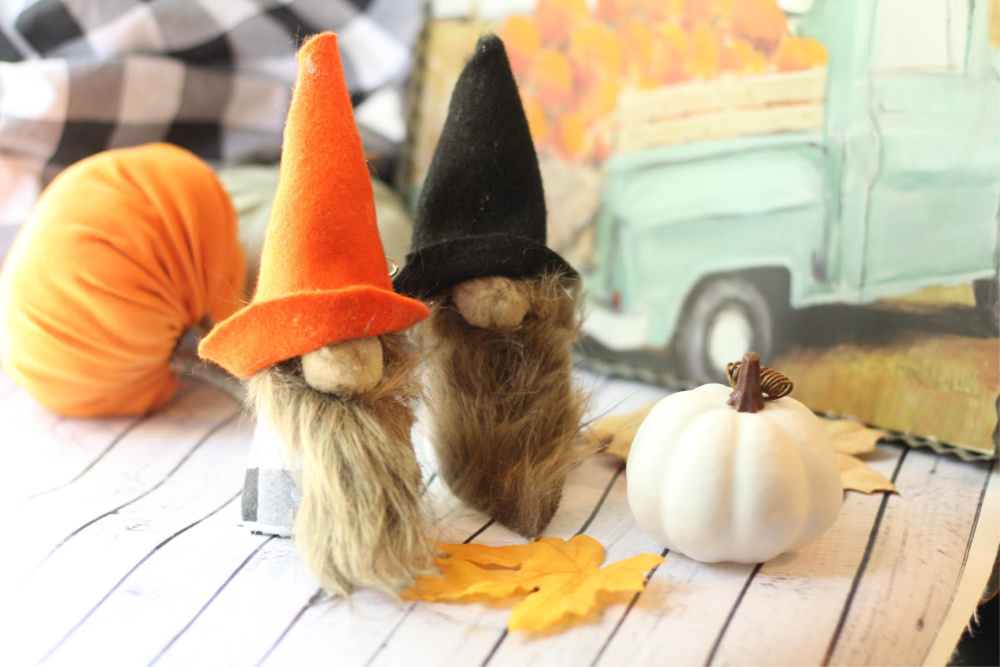
I created some cute little DIY fall gnomes in autumn colors to boost up my fall decor! These sweet little guys are a fun and easy DIY craft!
They’re super versatile, too. You could put them on a table, on a tiered tray, or even just hide them around the house on the mantle and in the kitchen. So much fun to bring a little whimsy into the house!

Last year I started seeing little Scandinavian gnomes popping up everywhere at Christmastime, and I fell in love with them! These Christmas gnomes were just ridiculously simple and easy, but so cute!!
This past year they seem to have made their way into multiple holidays and themes, and they are an adorable addition to any home decor. I wanted to create some cute little DIY fall gnomes in autumn colors to boost up my coffee bar, tablescapes and anywhere else I can think of to put these sweet little guys.

I am giving you simple directions, use your creativity to make your DIY fall gnomes uniquely yours!
What Do You Need to Make a DIY Fall Gnome:
- Small styrofoam floral cones
- Check or plaid fabric
- Craft felt in fall colors
- Craft fur
- Small cream, white, or brown pom poms
- Tacky craft glue (or hot glue)
- Scissors
You will not need a rubber band for this one, but sometimes gnomes call for that, so be aware if you make other gnomes…

How to Make a Fall Gnome
- Cover your cone, except the bottom with tacky craft glue.
- Starting with the bottom of your cone on one of the straight edges of your check fabric roll until it is covered completely. Stretch and straighten your material until it is smooth.
- Cut away excess fabric leaving a bit of overlap on the bottom so you can fold and glue it under. If you want to finish the bottom off you can cut a piece of felt to the same size as the circle and glue it in place.
- Next we are gonna roll the hat, roll it from one corner and try it on your gnome so that it sits just a bit loosely halfway down the cone. Secure the seam up the back with glue and trim away excess until it resembles a cone shape. Trim the bottom so that it is even all the way around then flip it up to create a cute little brim. Set aside and let the hat dry.
- From your craft fur you will then cut a small mustache in what is roughly a v shape, and a diamond shaped beard . Here is where you can infuse personality into your gnome, the shapes I recommend are a rough sketch on purpose , differ their beard shapes and lengths to make them each unique. Once you are happy secure the beard with glue to the cone, pressing firmly about halfway up.
- Glue a small pom pom just above the beard for his nose.
- Glue on your mustache over the nose, adjusting it as you like.
- Draw the hat down over the top so that it overlaps the mustache and touches the nose, glue in place.
- Set aside until dry.
A whole village of these gnomes would make a wonderful addition to all your holiday decor!
And look out, because I’m making more of these adorable gnome crafts and they’re coming your way just as soon as I can get them photographed and on the site.
Maybe a holiday gnome to up my Christmas decoration game? We’ll see!
DIY Fall Gnomes
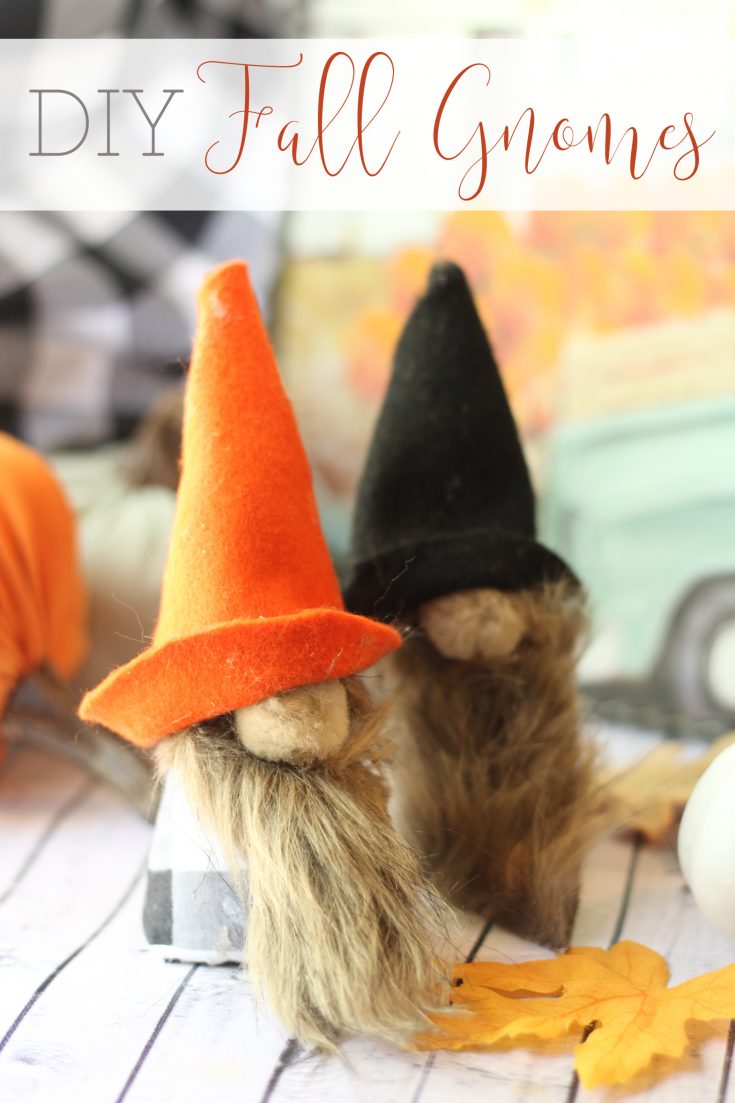
I created some cute little DIY fall gnomes in autumn colors to boost up my fall decor! These sweet little guys are a fun and easy DIY craft!
Materials
- Small styrofoam floral cones
- Check or plaid fabric
- Craft felt in fall colors
- Craft fur
- Small cream, white, or brown pom poms
Tools
- Tacky craft glue (or hot glue)
- Scissors
Instructions
- Cover your cone, except the bottom with tacky craft glue.
- Starting with the bottom of your cone on one of the straight edges of your check fabric roll until it is covered completely. Stretch and straighten your material until it is smooth.
- Cut away excess fabric leaving a bit of overlap on the bottom so you can fold and glue it under. If you want to finish the bottom off you can cut a piece of felt to the same size as the circle and glue it in place.
- Next we are gonna roll the hat, roll it from one corner and try it on your gnome so that it sits just a bit loosely halfway down the cone. Secure the seam up the back with glue and trim away excess until it resembles a cone shape. Trim the bottom so that it is even all the way around then flip it up to create a cute little brim. Set aside and let the hat dry.
- From your craft fur you will then cut a small moustache in what is roughly a v shape, and a diamond shaped beard . Here is where you can infuse personality into your gnome, the shapes I recommend are a rough sketch on purpose , differ their beard shapes and lengths to make them each unique. Once you are happy secure the beard with glue to the cone, pressing firmly about halfway up.
- Glue a small pom pom just above the beard for his nose.
- Glue on your mustache over the nose, adjusting it as you like.
- Draw the hat down over the top so that it overlaps the mustache and touches the nose, glue in place.
- Set aside until dry.
Very cute and perfect to miss in with all those pumpkins! Visiting from Sundays at Home party.
I think I will be making these this week! Adorable!
Very cute!! Thanks for sharing at Lets Party! Can’t wait to see you again this week!
holy cuteness. love these. Thanks for sharing at To Grandma’s House We Go DIY, Crafts, Recipes and More Wednesday Link Party. I pinned this! Hope to have you join again next week!
I love gnomes and these are so cute!! Thanks for sharing with SYC.
hugs,
Jann
Your gnomes are so cute. They’d be perfect in some of the fairy gardens needing fall decor too :). Thanks for sharing at last week’s RTT Party. Hope to see you this week (we’re open and growing all week long: http://www.jodiefitz.com/2018/10/09/reader-tip-tuesday-weeks-craft-recipe-party-14-2-2-2-2-2-2-2-2-2-2-2-2-2-2-2-2-2-2-2-2-2-2-2-2-2-2-2-2-2-2-2-2-2-2-2-2-2-2-2-2-2-2/
So so cute! Thanks for sharing at TFT. Pinning!
These little gnomes are adorable.
Good job.
Lisa
I love them as well. Yours are so cute!
I love this bit of whimsy!
These are SO CUTE. I want to make some also. Thanks so much for showing how!! Best wishes for the week ahead. Linda @Crafts a la mode
These are too cute – I love them! I am putting these on my list to try.
Totally adorable! I have made Christmas, Valentine and Easter gnomes, now I can’t wait to make these!
These are just darling! I love gnomes! My kids would so enjoy making their own little fall gnomes. Definitely adding this to our crafting list.
BTW, visiting from the Sits Girls Sharefest Saturday link party!