Busy Being Jennifer

What doesn't kill you make you blonder

  • Home
  • Blog
  • Shop
  • Contact
  • Recipes
  • DIY Projects
  • Crafts
  • Essential Oils
  • Every Day Boss

June 25, 2015 by Jennifer

101 Handmade Days: Braided Fabric Headband

This post may contain affiliate or brand partner links. Read our full disclosure here.

I’m a bit of a scrap fabric hoarder… I just never know when I’m going to need them and I can’t bring myself to part with the rainbow of bits and pieces. Besides, I love coming up with fun and unique ways to use up all the fabric odds and ends! I’ve had some longer strips added to the ever growing pile with all the sewing projects I’ve been doing for these 101 Handmade Days projects and decided to put them to good use as a Braided Fabric Headband!

Braided Fabric Headband - BusyBeingJennifer.com #101HandmadeDays

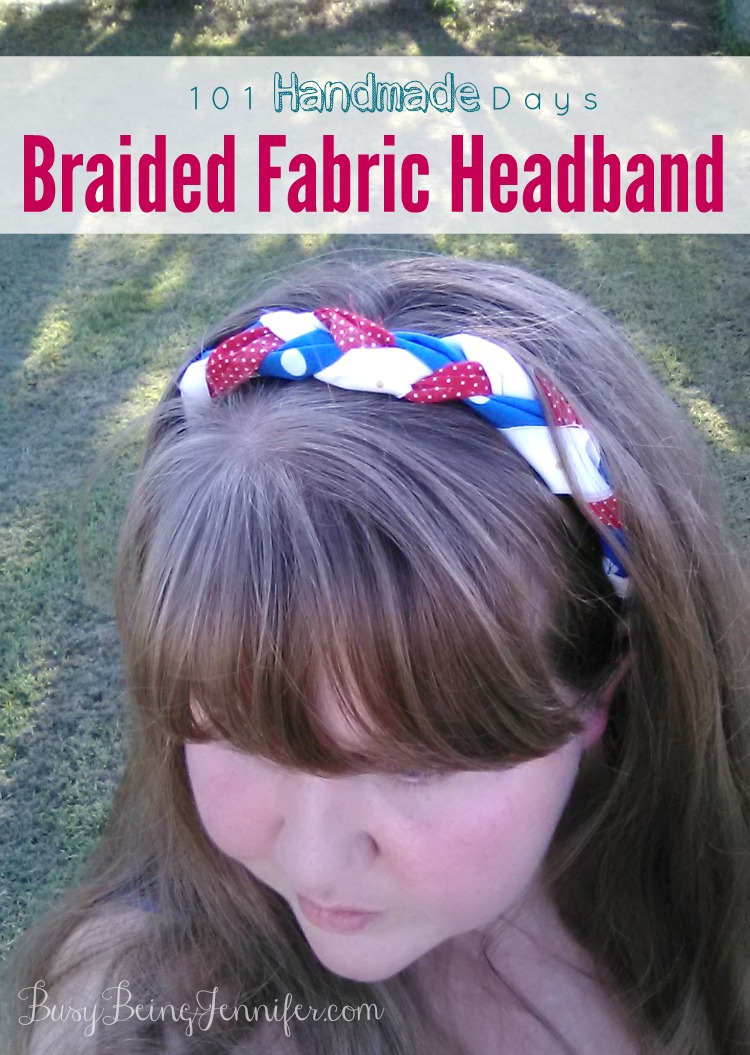
Not only is this braided fabric headband a great scrap buster, its a quick and fairly easy project too! And gosh darn-it, its danged cute to boot!

Braided Fabric Headband - BusyBeingJennifer.com #101HandmadeDays

Supplies: Fabric Strips, Flat Elastic, Sewing Machine, Thread and Scissors.

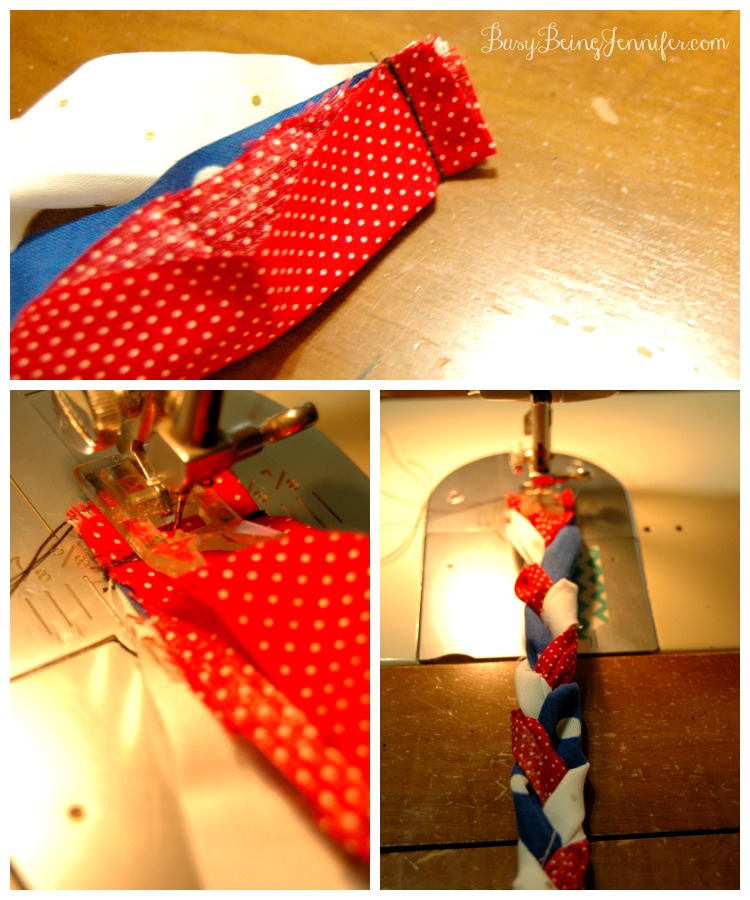
You’ll need 3 strips of different colored fabric approximately 2 inches wide and 20 + inches long. They don’t have to be cut perfectly, and if they are too long, they can be trimmed at the end 🙂

Start by folding the ends of the fabric strips in half and layering then on top of each other. Sew a straight line across the folded and layered fabric, 1/2 from the end. Reinforce by sewing across the same line several times.

Use your sewing machines pressure foot to secure the end of the fabric (as shown above) and braid until you’ve got 10 – 12 inches of braided fabric, or until it wraps 2/3’s of the way around your head.

Finish the braid by securing the fabric together with a well reinforced straight line of sewing.

Braided Fabric Headband - BusyBeingJennifer.com #101HandmadeDays

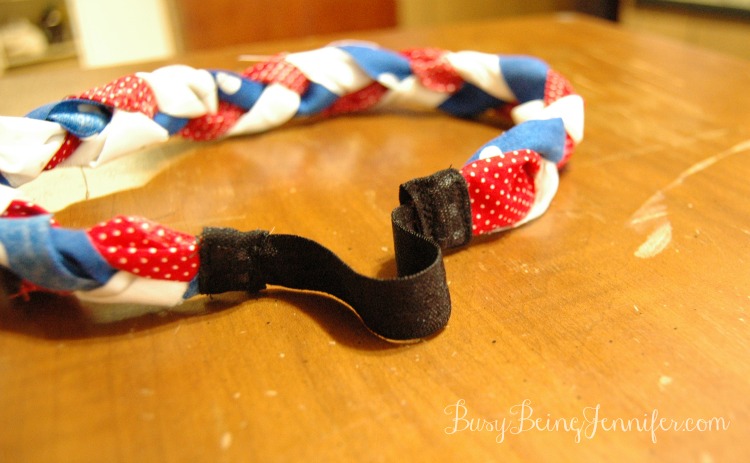
Add your elastic by folding the secured fabric ends around it and sewing several lines of straight stitching to secure it in place.

Optional: Cover the raw edges of fabric and elastic by wrapping additional elastic around the ends, covering the raw edges. Secure in place with 2 lines of straight stitching, top and bottom.

Trim your threads.

Then fix your hair and show off your new Braided Fabric Headband!

Braided Fabric Headband - BusyBeingJennifer.com #101HandmadeDays

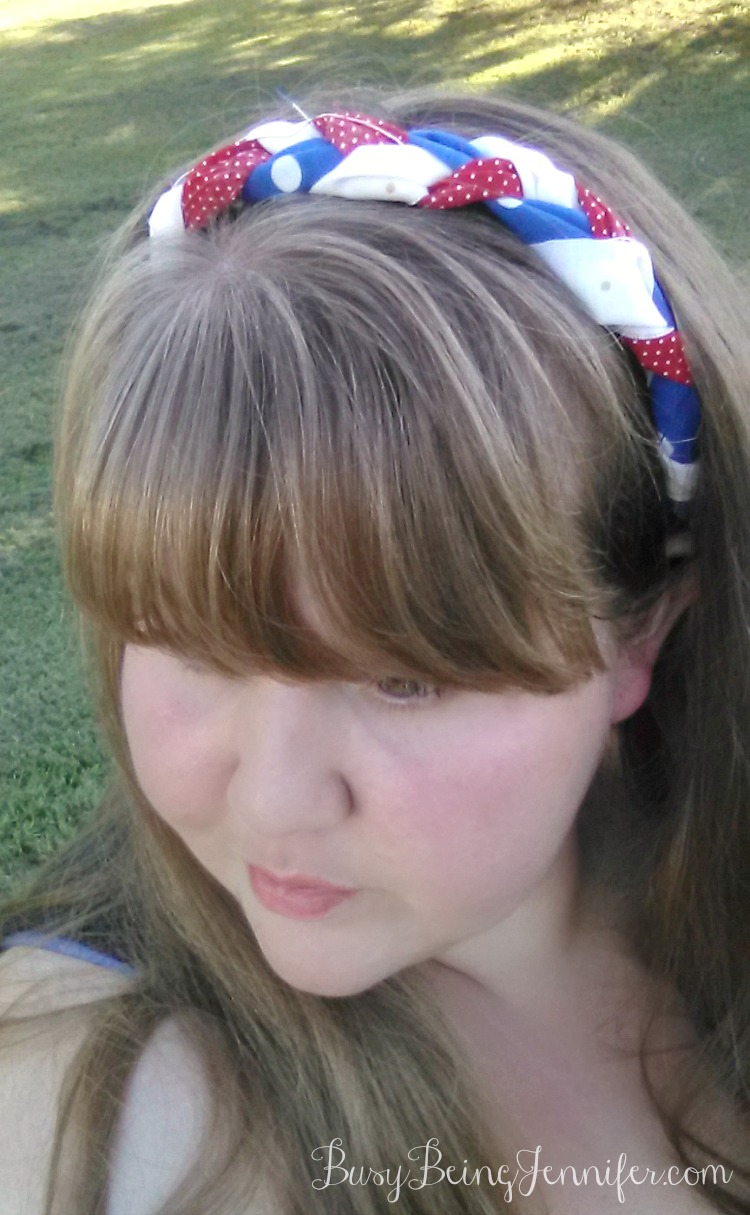
I told you it was cute! And its so easy to make, you can have a new hair accessory for any occasion! All you have to do is use different colored fabrics!

Easy and Cute! Make your own Braided Fabric Headband with this Simple Tutorial!

Click To Tweet

Filed Under: Sewing Tagged With: DIY Project, easy diy, sewing, tutorial

❮❮ Previous Post
Next Post ❯ ❯

Comments

  1. werefarfromnormal says

    June 25, 2015 at 7:56 pm

    This is so cute! I have a big head so most headbands don’t fit me so I have to make them, I’ll have to whip one of these up!

    Reply
  2. lisa says

    June 25, 2015 at 9:57 pm

    So pretty & patriotic!

    Reply
  3. Terra Heck says

    June 27, 2015 at 12:12 am

    That’s a very cute and festive headband.

    Reply

Leave a Reply Cancel reply

Your email address will not be published. Required fields are marked *

About Me
  • Facebook
  • Instagram
  • Pinterest
  • RSS
  • Twitter

Search

Categories

As an Amazon Associate I earn from qualifying purchases.

Places I Party...

[instagram-feed]

© 2022 · Busy Being Jennifer · Privacy Policy

We are using cookies to give you the best experience on our website.

You can find out more about which cookies we are using or switch them off in settings.

Busy Being Jennifer
Powered by  GDPR Cookie Compliance
Privacy Overview

This website uses cookies so that we can provide you with the best user experience possible. Cookie information is stored in your browser and performs functions such as recognising you when you return to our website and helping our team to understand which sections of the website you find most interesting and useful. Read our complete privacy policy here.

You can adjust all of your cookie settings by navigating the tabs on the left hand side.

Strictly Necessary Cookies

Strictly Necessary Cookie should be enabled at all times so that we can save your preferences for cookie settings.

If you disable this cookie, we will not be able to save your preferences. This means that every time you visit this website you will need to enable or disable cookies again.